
Been doing a few bits with muddymusic’s Jumping PCB.
I wanted to see how the C-Chip substitute ROM was wired into the circuit so ive made a small schematic and reversed the address decoder PAL.
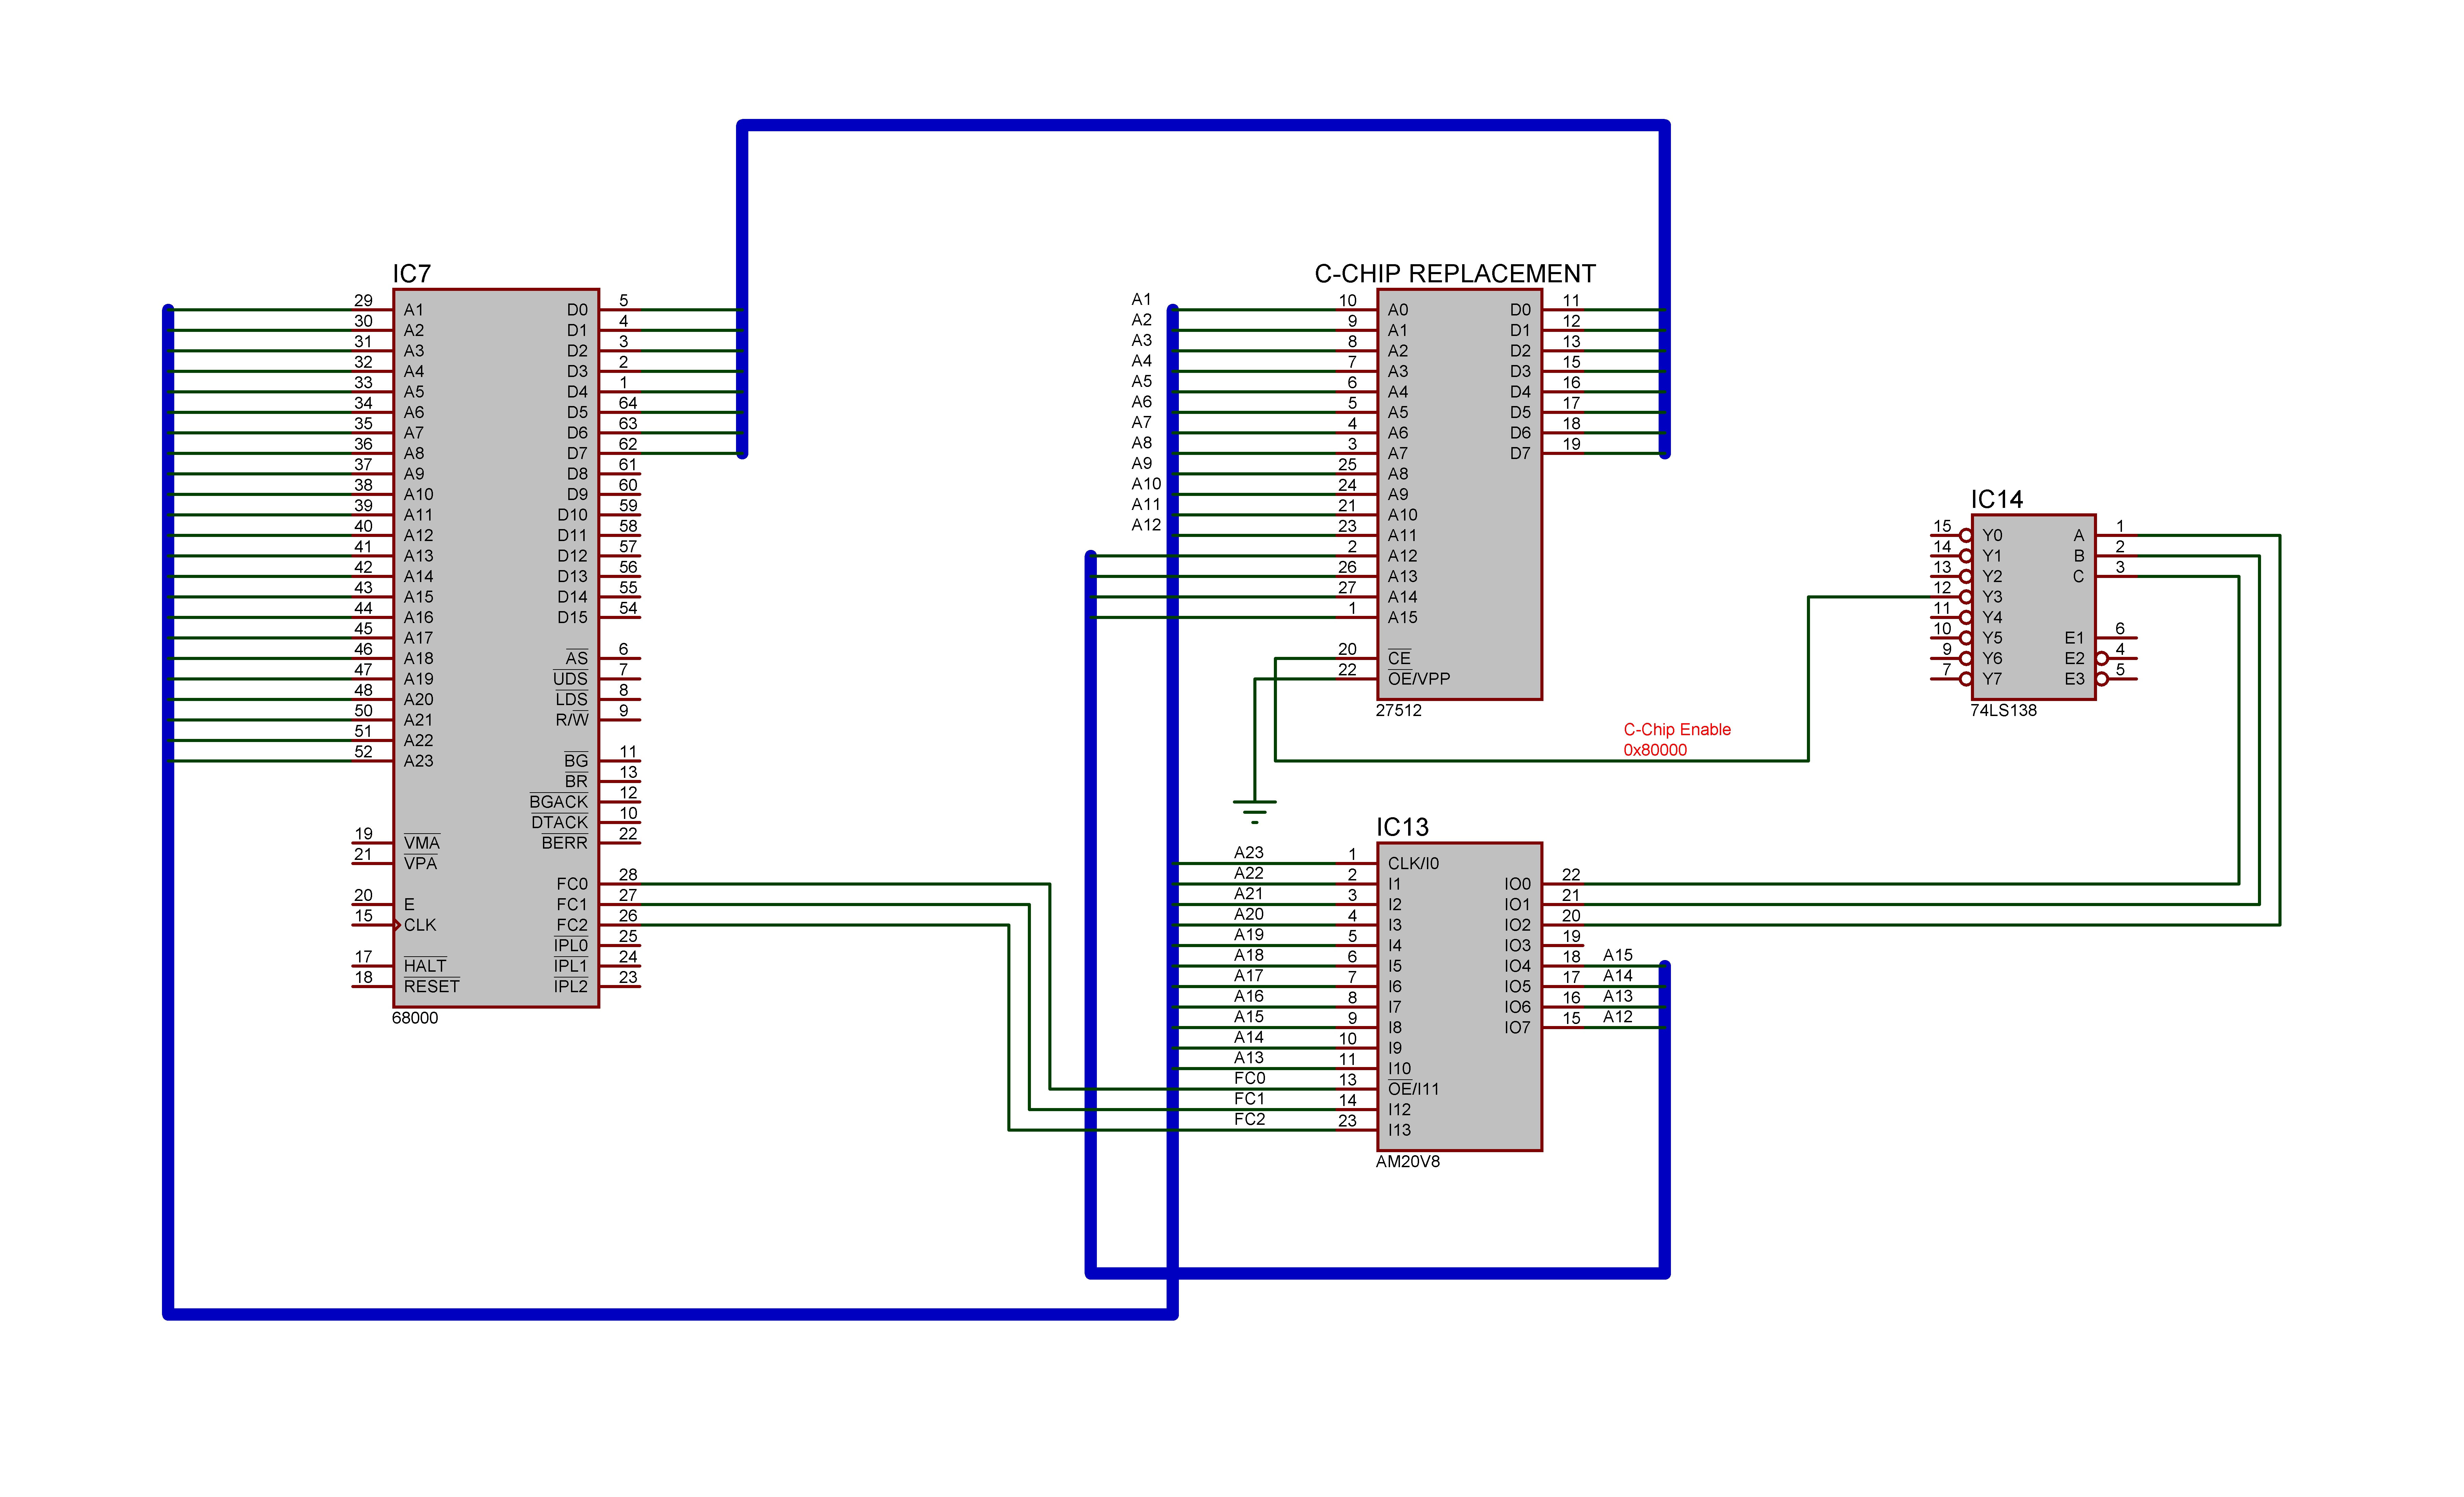
click the pic for full size.
Here are the equations for the address decoder too. Ive renamed to the pins to something more suitable for human consumption.
/* Inputs */
Pin 1 = A23;
Pin 2 = A22;
Pin 3 = A21;
Pin 4 = A20;
Pin 5 = A19;
Pin 6 = A18;
Pin 7 = A17;
Pin 8 = A16;
Pin 9 = A15;
Pin 10 = A14;
Pin 11 = A13;
Pin 13 = FC0;
Pin 14 = FC1;
Pin 23 = FC2;
/* Outputs */
Pin 15 = CA12; /* A12 of C-Chip replacement ROM */
Pin 16 = CA13; /* A13 of C-Chip replacement ROM */
Pin 17 = CA14; /* A14 of C-Chip replacement ROM */
Pin 18 = CA15; /* A15 of C-Chip replacement ROM */
Pin 19 = LROM; /* Chip enable for other ROM’s */
Pin 20 = A; /* Pin 1 of 74LS138. Input A */
Pin 21 = B; /* Pin 2 of 74LS138. Input B */
Pin 22 = C; /* Pin 3 of 74LS138. Input C */
/* Equations */
!CA12 = !A23 & !A22 & !A21 & !A20 & !A19 & !A13 #
!A23 & !A22 & !A21 & A20 & !A19 & !A18 & !A17 & !A16 & A15 & A14 & !A13 #
!A23 & A22 & !A21 & !A20 & !A19 & !A18 & !A17 #
!A23 & A22 & !A21 & !A20 & !A19 & !A18 & A17 & A16 #
A23 & A22 & !A21 & !A20 & !A19 & !A18 & !A17 & !A16 & !A13 #
!A23 & !A22 & !A21 & !A20 & A19 & !A18 & !A17 & !A13 #
A23 & A22 & !A21 & A20 & !A19 & !A18 & !A17 & !A16 & !A15 & !A14 & !A13;
!CA13 = !A23 & !A22 & !A21 & !A20 & !A19 & !A14 #
!A23 & A22 & !A21 & !A20 & !A19 & !A18 & A17 #
A23 & A22 & !A21 & !A20 & !A19 & !A18 & !A17 & !A16 & !A14 #
!A23 & !A22 & !A21 & !A20 & A19 & !A18 & !A17 & !A14;
!CA14 = !A23 & !A22 & !A21 & !A20 & !A19 & !A15 #
A23 & A22 & !A21 & !A20 & !A19 & !A18 & !A17 & !A16 & !A15 #
!A23 & !A22 & !A21 & !A20 & A19 & !A18 & !A17 & !A15;
!CA15 = !A23 & !A22 & !A21 & !A20 & !A16;
!LROM = !A23 & !A22 & !A21 & !A20 & !A17;
!A = !A23 & !A22 & !A21 & !A20 & !A19 & !A18 #
!A23 & !A22 & !A21 & A20 & !A19 & !A18 & !A17 & !A16 & A15 & A14 #
!A23 & !A22 & A21 & !A20 & !A19 & !A18 & !A17 & !A16 & !A15 & !A14 & !A13 #
A23 & A22 & !A21 & !A20 & !A19 & !A18 & !A17 & !A16 #
A23 & A22 & !A21 & A20 & !A19 & !A18 & !A17 & !A16 & !A15 & !A14 & !A13;
!B = !A23 & !A22 & !A21 & !A20 & !A19 #
A23 & A22 & !A21 & !A20 & !A19 & !A18 & !A17 & !A16 #
!A23 & A22 & !A21 & !A20 & !A19 & A18 & !A17 & !A16 #
A23 & A22 & !A21 & A20 & !A19 & !A18 & !A17 & !A16 & !A15 & !A14 & !A13;
!C = !A23 & !A22 & !A21 & !A20 & !A19 #
!A23 & !A22 & !A21 & A20 & !A19 & !A18 & !A17 & !A16 & A15 & A14 #
!A23 & !A22 & !A21 & !A20 & A19 & !A18 & !A17;
The A, B and C outputs from the PAL feed into a 74LS138. In order to select the C-Chip substitute A and B must be HIGH and C must be LOW. From the equations (or just looking at the MAME source code) we can work out that the C-Chip ROM lies at address 0x80000.
So, not a great deal of info but its pretty interesting all the same.


